Table of Contents
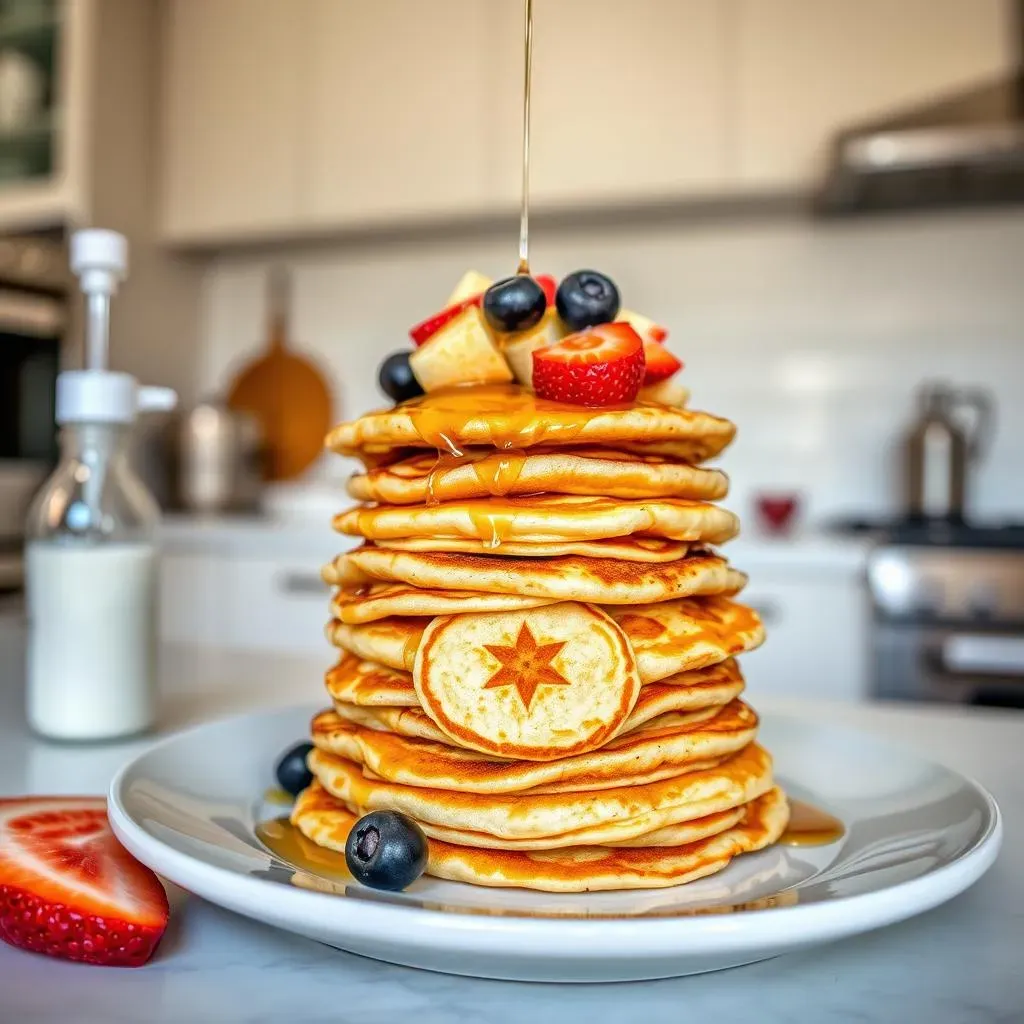
Ever looked at a stack of pancakes and thought, "These could be so much more"? Well, you're not alone! Forget plain circles; it's time to transform your breakfast into a canvas. This is where the magic of pancake art happens, and it's easier than you think with the right pancake art supplies. We're not talking about just any old spatula and bowl here. We're talking about specialized tools that can help you create everything from simple shapes to intricate designs. This article is your guide to navigating the world of pancake art supplies. We'll start with the essentials, like squeeze bottles and griddles, then move onto batter tips and coloring techniques. I'll walk you through the process, step-by-step, to get you creating your own edible masterpieces in no time. We'll tackle some common problems and share some secret tips that'll make you a pancake art pro. By the end, you'll be ready to ditch the boring breakfast routine and start making some seriously cool, delicious art.
Essential Pancake Art Supplies: What You'll Need
Essential Pancake Art Supplies: What You'll Need
The Foundation: Your Griddle
Okay, let's start with the stage where all the magic happens: the griddle. Forget those flimsy frying pans; you need something that heats evenly and stays that way. I'm talking about a good, non-stick griddle. It doesn't need to be fancy, but it should have a flat surface and be able to maintain a consistent temperature. A consistent temperature is key to preventing some spots from cooking faster than others, which will ruin your design. Electric griddles are great because you can dial in the heat precisely, but a stovetop griddle will work too, just keep a close eye on it.
Think of your griddle as the canvas for your pancake art. You wouldn’t paint on a warped canvas, would you? The same goes for your griddle. A smooth, evenly heated surface is your best friend for a good-looking pancake.
Batter Bottles: Precision is Key
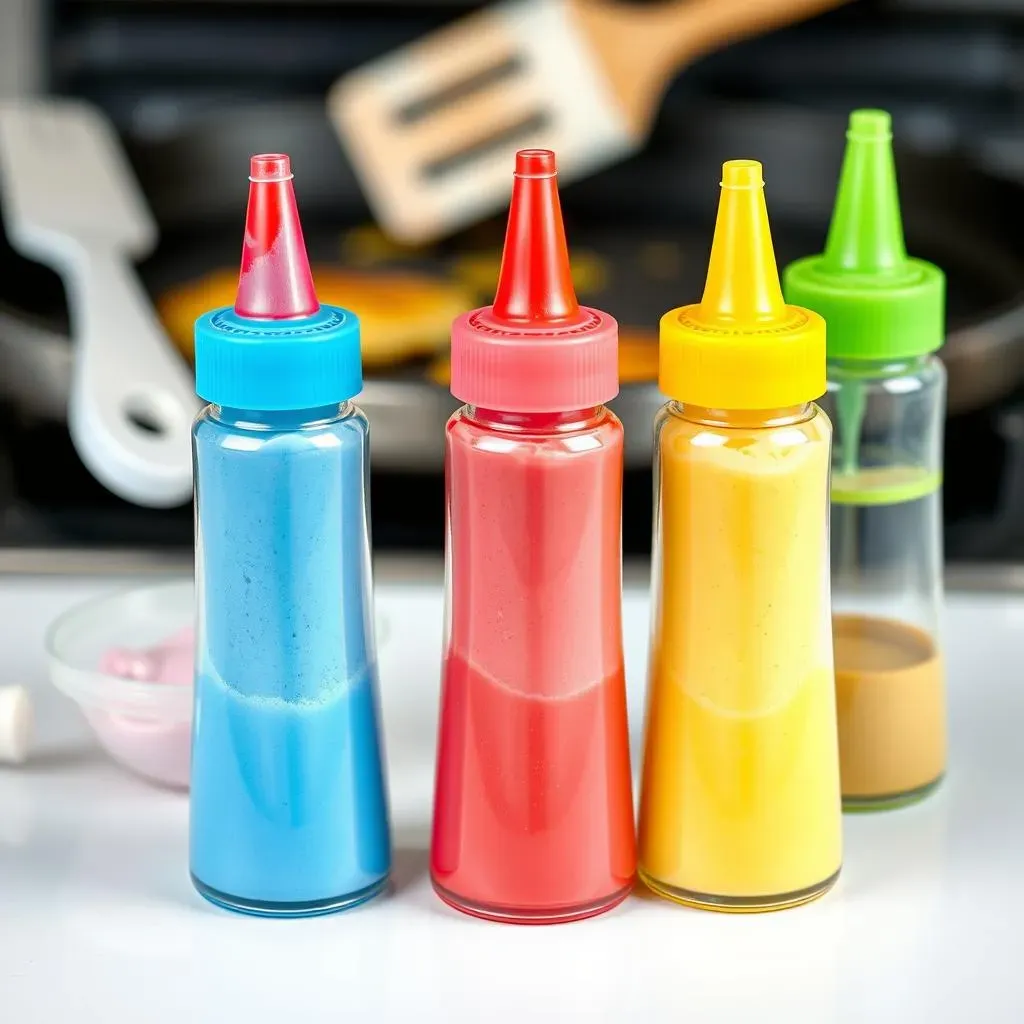
Next up, let's talk about the tools that'll help you put the batter where you want it. Forget pouring from a bowl – that’s a recipe for a mess. You need squeeze bottles. These aren't just any old condiment bottles; they're your precision tools. Look for ones with a narrow tip for fine lines and detail work. Some bottles even come with different tips for varying line thickness. It's a game changer, I'm telling you. Having multiple bottles is also handy, so you can have different colors ready to go without having to empty and refill one bottle.
Imagine trying to draw a detailed picture with a fire hose, that is the same as trying to make pancake art without the right bottle. A good squeeze bottle is like a fine-tipped pen for your pancake batter.
Supply | Why it's Essential |
|---|---|
Non-stick griddle | Even heat distribution for consistent cooking |
Squeeze bottles | Precision dispensing of batter for detailed designs |
Spatula | For flipping and maneuvering your pancake art |
The Supporting Cast: Spatulas and More
Now, you’ll need a good spatula. It needs to be thin enough to get under your delicate pancake creations without tearing them, but sturdy enough to flip them confidently. Avoid those thick, clunky spatulas; they're more likely to ruin your art. A thin metal spatula with a slightly angled edge is perfect. You might also want a small offset spatula for maneuvering batter or lifting edges. And don't forget a good mixing bowl and whisk for getting your batter smooth and lump-free. These might seem basic, but they make a big difference. A smooth batter is crucial for detailed art, and a good spatula will keep your creations intact when you flip them.
Think of your spatula as the steady hand that guides your art from the griddle to the plate.
Choosing the Right Pancake Art Batter and Colors
Choosing the Right Pancake Art Batter and Colors
Batter Up: Finding the Perfect Consistency
Okay, so you've got your griddle, your bottles, and your spatula; now let's talk batter. Not all pancake batter is created equal, especially when it comes to art. You need a batter that's not too thick and not too thin – think of it like a smooth, flowing paint. If it's too thick, it'll be hard to squeeze out of the bottles and won't spread properly. If it's too thin, it'll run all over the griddle and you'll lose all your detail. I like to aim for a consistency that's just a bit thinner than regular pancake batter. Some people swear by using a specific recipe with buttermilk or a little bit of oil to make it extra smooth. I say, experiment! Find what works for you.
A good batter is the foundation of great pancake art. It needs to be fluid enough to flow, but thick enough to hold its shape.
Coloring Your Canvas: Food Gels vs. Liquids
Now for the fun part: color! This is where your pancake art really comes to life. Forget those watery liquid food colorings you find in the grocery store; they'll mess with your batter consistency. You need gel food coloring. These are highly concentrated, so a little goes a long way, and they won't change the texture of your batter. You can find them in a wide variety of colors, and they're easy to mix to create custom shades. I like to use small bowls or cups to mix my colors and then transfer them to the squeeze bottles. This way, I can have a rainbow of colors ready to go. Start with a tiny bit of color and add more until you reach the shade you're looking for. Remember, you can always add more, but you can't take it out.
Think of your food coloring as the paint for your pancake art, a good color will make your art pop.
Coloring Type | Pros | Cons |
|---|---|---|
Liquid Food Coloring | Readily available, inexpensive | Can alter batter consistency, less vibrant color |
Gel Food Coloring | Highly concentrated, vibrant colors, doesn't alter batter consistency | Can be slightly more expensive |
One Batter, Many Colors: Separating and Mixing
I like to start with one big batch of batter and then separate it into smaller bowls for coloring. This way, I don't have to make a bunch of individual batches. Once you've got your colors mixed, it's time to load up your squeeze bottles. Make sure you don't fill them to the top. You need a little space at the top to prevent the batter from leaking out when you squeeze. And remember to label your bottles if you're using multiple colors. It's no fun trying to figure out which bottle has the blue batter in it when you're in the middle of creating your masterpiece.
"The secret to great pancake art isn't just in the technique, it's also in the quality of the ingredients and the colors you use." - Pancake Art Enthusiast
StepbyStep Guide: Creating Amazing Pancake Art
StepbyStep Guide: Creating Amazing Pancake Art
Start Simple: Basic Shapes and Outlines
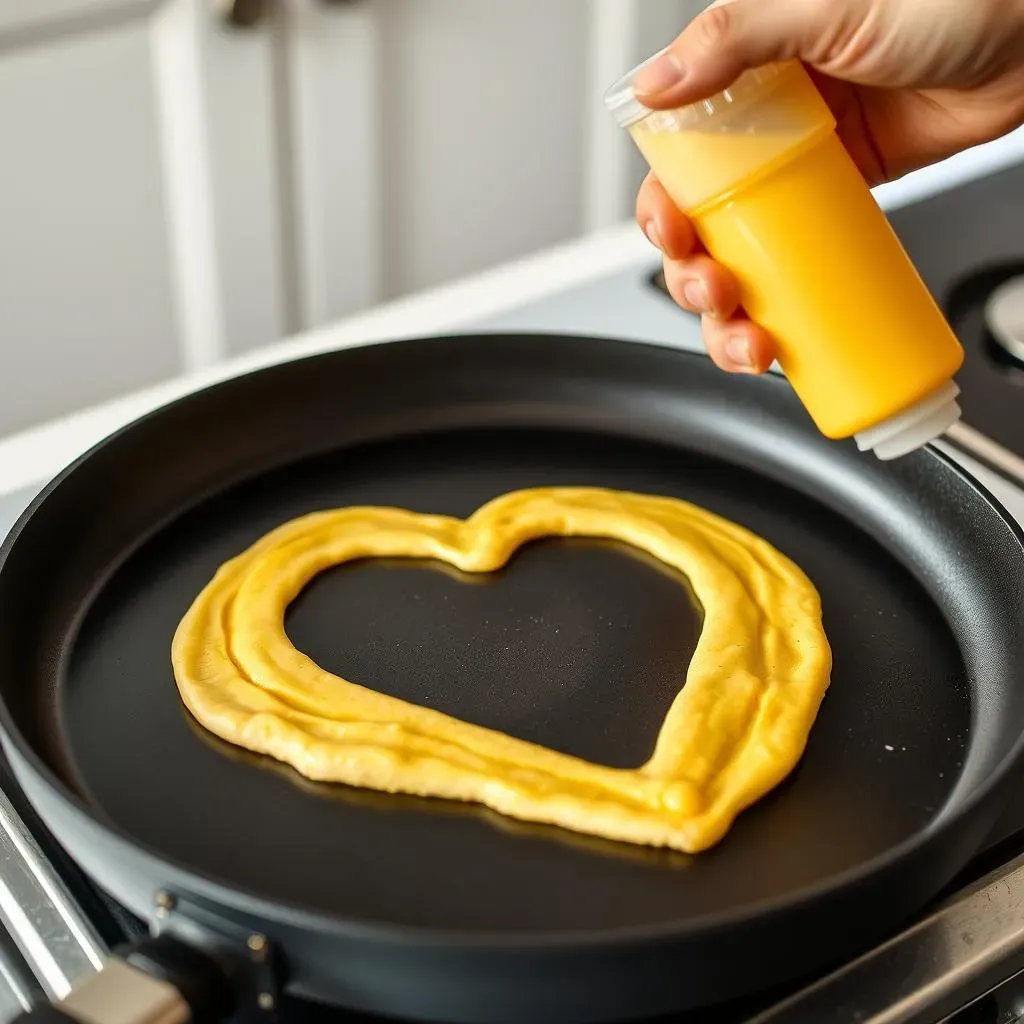
Alright, so you've got your batter prepped, your colors mixed, and your tools ready. Now, let's get to the fun part: actually making pancake art! Don't jump straight into trying to create a detailed portrait; start simple. Begin with basic shapes like circles, hearts, or stars. Use your squeeze bottle to outline the shape first, then fill it in. Remember to keep the tip of the bottle close to the griddle surface and squeeze gently. You don't need to apply a lot of pressure. If you make a mistake, don't worry. You can always try again. Practice makes perfect, and even "mistakes" can sometimes turn into cool-looking designs. The key is to build up your confidence and control with simple shapes before moving on to more complex designs. It's like learning to draw; you wouldn't start with a masterpiece, right?
Think of your first few pancakes as practice rounds. The goal is to get comfortable with the batter and the tools, not to create a work of art right away. It's about building up your skills step by step.
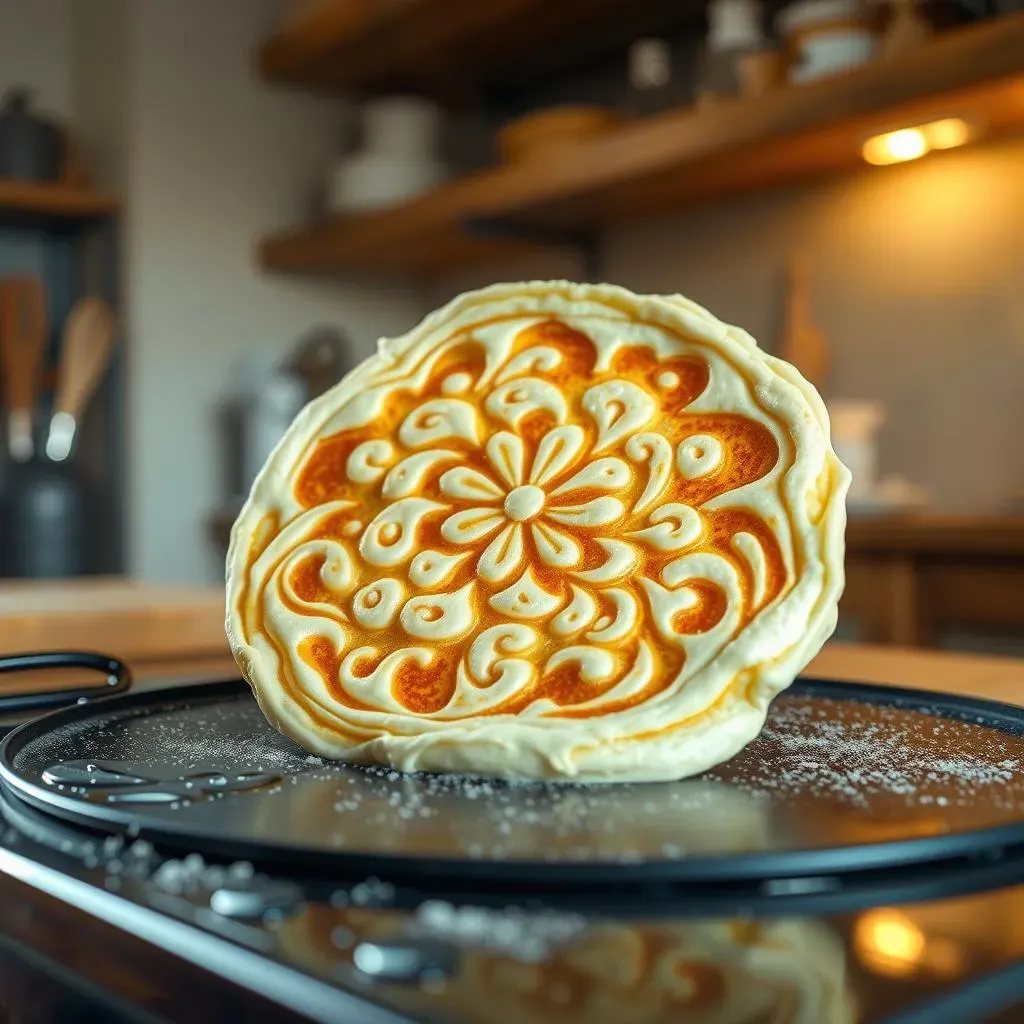
Adding Details and Layers: Building Your Design
Once you've mastered basic shapes, it's time to add some details. Try layering different colors to create depth and dimension. For example, you can make the outline of a shape in one color, then fill it in with another. Or, you can add dots, lines, and other small details to your design. Let the first layer cook for a bit before adding the next, so the colors don't mix too much. Don't be afraid to experiment! Use a toothpick or a small spatula to move the batter around and create unique effects. You can even try using multiple squeeze bottles at the same time to draw different lines. The possibilities are endless. It's like building a sculpture; you start with the basic structure and then add the details to make it come to life.
The beauty of pancake art is that you can be as creative as you want. There are no rules, so just have fun with it.
Step | Action |
|---|---|
1 | Outline the shape with a squeeze bottle. |
2 | Fill in the shape with batter. |
3 | Add details and layers with different colors. |
Pancake Art Supplies: Tips, Tricks, and Troubleshooting
Pancake Art Supplies: Tips, Tricks, and Troubleshooting
Battling the Bubbles: Smooth Batter Secrets
Alright, let's talk about those pesky bubbles that can ruin your pancake art. They're the bane of every pancake artist's existence! The secret to a smooth, bubble-free batter is to mix it gently. Over-mixing creates air pockets that can lead to bubbles on the griddle. Use a whisk and mix just until the ingredients are combined. Don't overdo it. Let the batter sit for a few minutes after mixing; this will allow any trapped air to escape. If you're still getting bubbles, try adding a tiny bit of baking powder to the batter. But be careful; too much baking powder can make your pancakes puffy and less suitable for detailed art. A smooth batter is key to clean lines and a professional-looking result. It's like preparing a canvas; you want it to be as smooth as possible for the paint to flow nicely.
"A little patience and a gentle hand can go a long way when it comes to mixing pancake batter." - Chef Pancake
Heat Control: The Goldilocks Zone
Getting the heat right is crucial for pancake art success. Too hot, and your pancakes will cook too fast, making it hard to control the batter. Too cold, and they won't cook evenly and will become pale. You need to find that sweet spot, the Goldilocks zone. I recommend starting with a medium-low heat. You want the griddle hot enough so that the batter cooks, but not so hot that it burns before you can finish your design. It's a balancing act. If you're using an electric griddle, experiment with the temperature settings until you find the right one. If you're using a stovetop griddle, use a low flame and move the pan around to ensure even heat distribution. The right heat will give you a golden-brown pancake that’s cooked through but still soft and pliable. It's like baking; the oven needs to be at the right temperature for the cake to rise perfectly.
Problem | Solution |
|---|---|
Bubbles in batter | Mix gently, let batter rest, use a tiny bit of baking powder if needed |
Pancakes cooking too fast | Lower the griddle temperature, reduce heat |
Unevenly cooked pancakes | Ensure even heat distribution, adjust heat |
Flipping and Troubleshooting: Saving Your Art
Flipping your pancake art can be a little nerve-wracking, especially when you've spent time creating a detailed design. The trick is to be patient and gentle. Wait until the pancake is cooked on the bottom and the edges are set before attempting to flip it. Slide your thin spatula under the pancake with confidence and flip it quickly and smoothly. Don't hesitate! If your pancake tears, don't panic. You can still salvage it. Use your spatula to carefully push the edges back together or add a bit more batter to fill any gaps. Remember, even if it's not perfect, it's still edible. And most importantly, it's something that you created yourself. It’s like a little puzzle; sometimes you need to rearrange the pieces to make it work.