Table of Contents
Ever looked at a plain pancake and thought, "This needs more pizzazz?" I have. That's where pancake art comes in. Forget boring circles; we're talking edible masterpieces, folks! But before you start picturing yourself as the next Van Gogh of the griddle, let's talk tools. This isn't just about flipping flapjacks. It's about transforming breakfast into an experience, and the right pancake art tools make all the difference. In this article, we'll explore the essential gear for beginners, from squeeze bottles to spatulas, and then move into more advanced techniques and equipment, perfect for when you're ready to level up your art. We'll also cover how to keep those tools clean, because nobody wants a sticky mess. So, whether you're a total newbie or a seasoned pancake Picasso, get ready to discover everything you need to create incredible, edible art. Let’s get flipping!
MustHave Pancake Art Tools for Beginners
MustHave Pancake Art Tools for Beginners
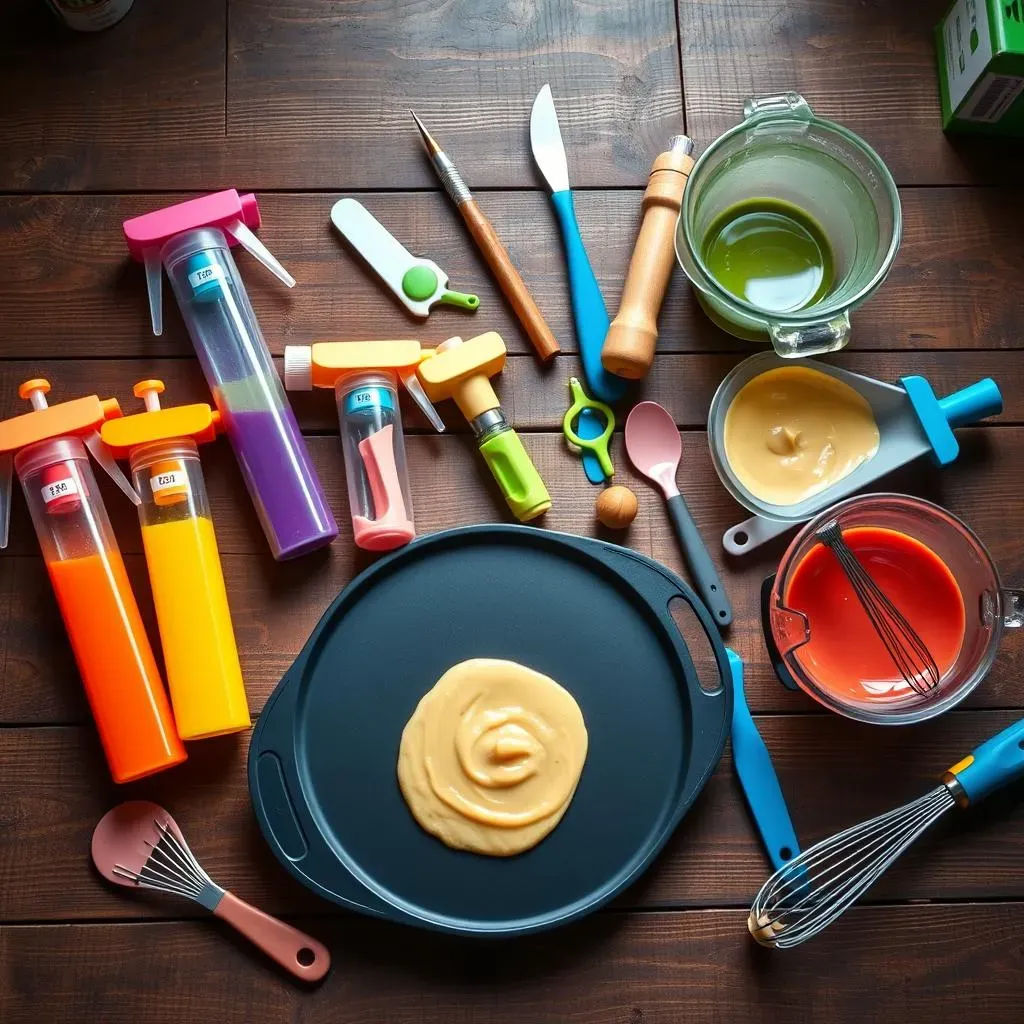
The Essential Squeeze Bottles
Okay, let's start with the real MVPs: squeeze bottles. You can't make pancake art without them, it's just a fact. These aren't your standard ketchup bottles, though. You'll want ones with a fine tip for detail, like those used for decorating cakes. Think of them as your pancake pens – they're how you'll draw your designs onto the hot griddle. I remember using a repurposed mustard bottle once. It was a disaster, the batter came out in a blob. Learn from my mistakes, get the proper bottles!
Having a few bottles is also a smart move. You can fill each with a different color batter, which saves you time and mess. Plus, it's just way more fun to create a rainbow of pancake goodness. I like to think of them as my little paint tubes, ready to bring my breakfast to life. And don't worry too much about getting fancy right away, just get the basics down first.
Griddle and Spatula Selection
Next up, a good griddle and spatula are your best friends. A non-stick griddle is key here, you don't want your beautiful creations sticking and tearing as you try to flip them. I’ve used a regular pan, and it worked okay, but a flat griddle gives you more space to work with. Go for a large one, if you can, it makes it easier to make multiple pancakes at once. As for the spatula, a thin, flexible one is the way to go. It’ll help you get under the pancake without damaging the delicate design. If you want to get even more fancy, try an offset spatula, it can help a lot with the flipping.
Tool | Why You Need It |
|---|---|
Squeeze Bottles | For drawing precise designs. |
Non-stick Griddle | To prevent pancakes from sticking. |
Thin, Flexible Spatula | For easy flipping without damage. |
Batter Mixing and Color
Lastly, let’s not forget the batter itself. While you can use any pancake mix, having a good mixing bowl and whisk will help you get the right consistency. You want the batter to be runny enough to flow through the squeeze bottle, but not so thin that it spreads out too much on the griddle. The right mix will make or break your design. Also, food coloring is essential for adding pops of color. Gel food coloring works best, it gives you vibrant hues without adding too much liquid, which is important for consistency. I remember adding too much liquid food coloring once, it turned out like a pancake soup. So, be careful with that.
Advanced Pancake Art Techniques and Equipment
Advanced Pancake Art Techniques and Equipment
Precision Piping and Layering
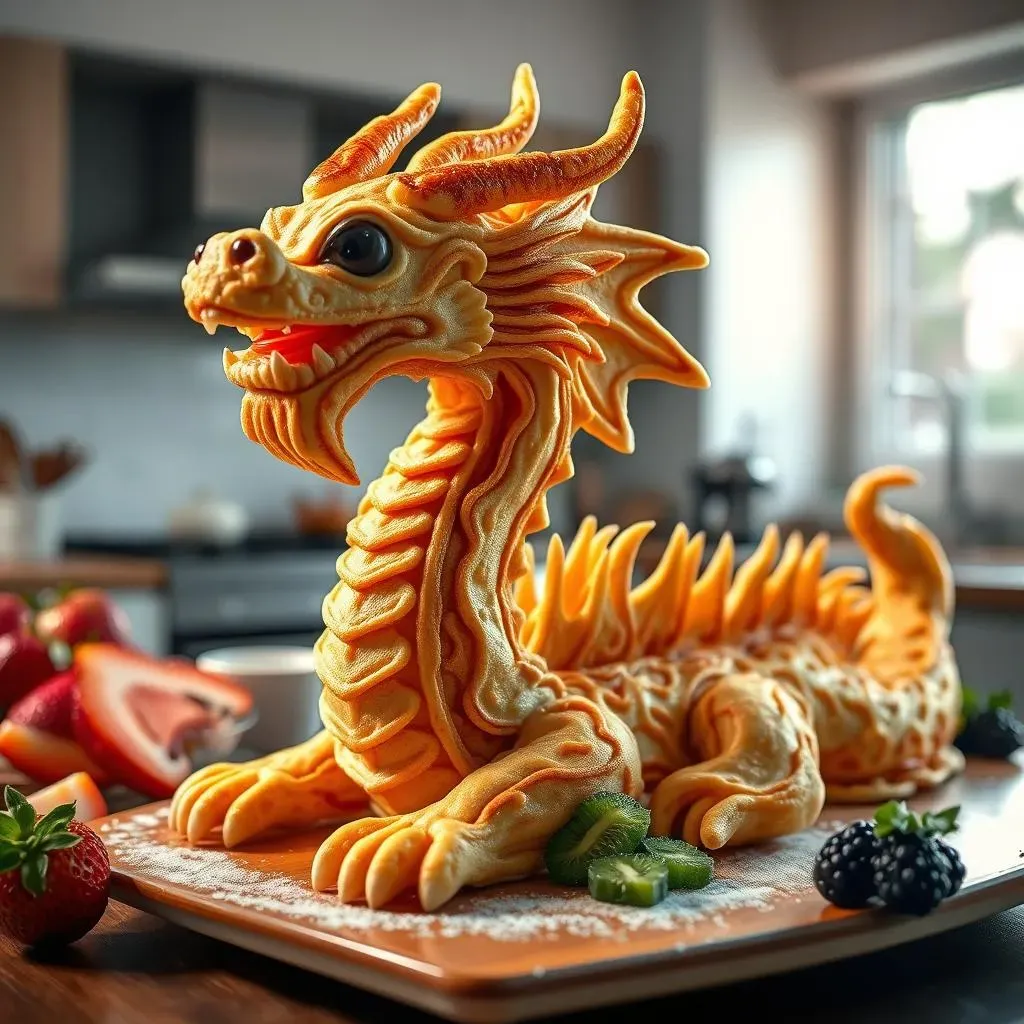
Alright, so you've mastered the basics, huh? Now it's time to crank things up a notch. When it comes to advanced pancake art, precision piping is where it's at. We're talking about using very fine-tipped squeeze bottles or even piping bags with different nozzles to create intricate lines and details. Instead of just drawing simple shapes, you're now layering batter, creating depth and dimension to your art. I remember trying to make a dragon and it looked more like a blob, but with practice and the right tools, you'll be making detailed masterpieces in no time. This takes practice, so don't worry if your first few attempts aren't perfect.
Another key technique is layering, where you pour different colors of batter on top of each other. This gives you a variety of effects, like shading or highlights. You can create a 3D effect by letting the initial layer cook slightly before adding another. This is how you move from simple designs to more complex, realistic-looking images. Be patient, this isn't a race. It's an art.
Specialized Griddles and Tools
Once you're hooked on pancake art, you might want to consider upgrading your equipment. While a regular non-stick griddle works great for beginners, a specialized pancake art griddle can make a big difference. These griddles often have better temperature control, which is crucial for cooking the batter evenly. Some even have different zones, allowing you to cook multiple pancakes simultaneously at different temperatures. This is a game-changer, when you are doing more complex designs. Also, you may want to get a set of fine-tipped spatulas for more control.
Tool | Benefit |
|---|---|
Fine-tipped Squeeze Bottles | For detailed lines and designs. |
Piping Bags with Nozzles | For varied batter textures and effects. |
Specialized Griddle | For consistent temperature and even cooking. |
Fine-tipped Spatulas | For more control when flipping. |
Color Techniques and Batter Consistency
Let’s talk color and batter consistency for a minute. As you get more advanced, you'll want to experiment with different food colorings and how they affect the final product. Some colors are more prone to browning than others, so having a good understanding of your color palette is important. I've found that gel food coloring gives the most consistent results, but you could also try using natural food colorings like beet juice for red or spinach juice for green. It’s fun to experiment and see what works best for you. Also, the batter consistency will need to be a bit thicker than the beginner batter, so it holds its shape better when you're doing layered designs. It is a balancing act, but that is the fun part.
Cleaning and Maintaining Your Pancake Art Tools
Cleaning and Maintaining Your Pancake Art Tools
The Immediate Clean-Up
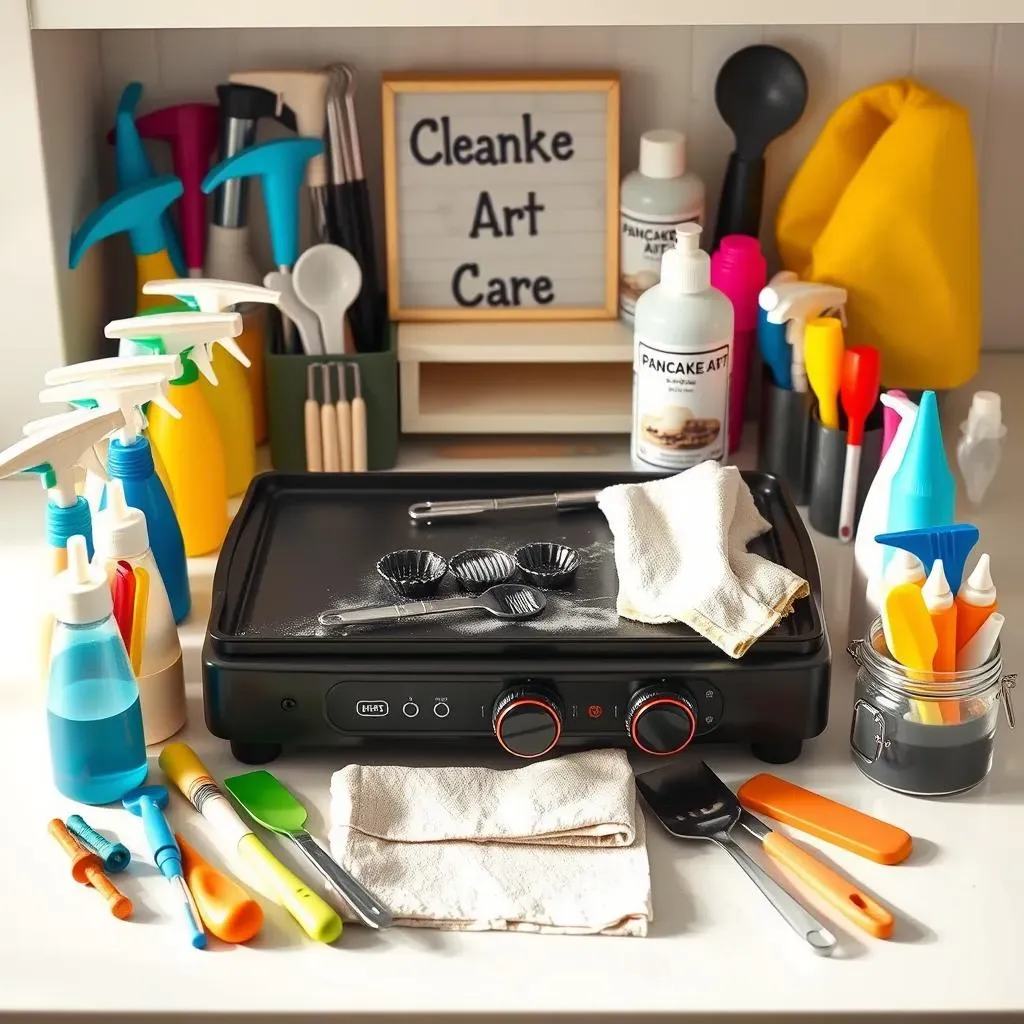
Okay, so you've just created a masterpiece, and now it's time to clean up. I know, it's not as fun as making art, but trust me, a little effort here goes a long way. The key is to clean your tools right after you're done, before the batter has a chance to dry. Dried batter is like concrete; it's hard to remove. Start by rinsing your squeeze bottles, piping bags, and spatulas with hot, soapy water. Make sure to get all the batter out of the nozzles and tips. I usually give them a good soak to loosen up any stubborn bits. It’s a bit of a pain, but it’s better than dealing with hardened batter later. And honestly, it's kind of satisfying to see all that sticky stuff wash away.
For the griddle, once it's cooled down a bit, wipe it clean with a damp cloth or paper towel. If you've got some stubborn spots, a bit of soapy water and a non-abrasive sponge will do the trick. Avoid using steel wool or anything too harsh, as you don't want to scratch the non-stick surface. I learned that the hard way when I scratched my favorite griddle. It was a sad day. Remember, a clean griddle is a happy griddle, and it will make your next pancake art adventure much smoother.
Deep Cleaning and Storage
Sometimes, a quick rinse isn't enough. For a more thorough clean, I like to disassemble my squeeze bottles and piping bags. This is especially important if you've been using different colors. I soak all the parts in hot soapy water, and then use a small brush to scrub any remaining batter. You can even use a pipe cleaner for those tiny nozzles. It's like a spa day for your pancake art tools. Once everything is clean and dry, make sure to store them properly. I prefer to keep my squeeze bottles in a container with the nozzles facing up, so they don’t get squished. Also, storing your tools in a cool, dry place will help them last longer and prevent any unwanted mold or mildew.
Tool | Cleaning Method | Storage |
|---|---|---|
Squeeze Bottles | Hot soapy water, disassemble and scrub nozzles | Upright in a container |
Piping Bags | Hot soapy water, scrub inside | Flat in a drawer or container |
Spatulas | Hot soapy water, non-abrasive sponge | Hanging or in a utensil holder |
Griddle | Damp cloth, soapy water, non-abrasive sponge | Cool and dry, covered |
Tips for Longevity
Finally, let's talk about keeping your pancake art tools in tip-top shape for the long haul. Avoid using metal utensils on your non-stick griddle, as it will scratch the surface. And don't leave your tools soaking for too long, as it can damage the materials. Also, if you notice any cracks or damage, it's best to replace the tool, as using damaged tools can affect your art. I had a squeeze bottle with a tiny crack, and it made a mess everywhere. It's better to be safe than sorry. Regular maintenance is key to keeping your tools in good condition, and it will make your pancake art journey much more enjoyable. It's like taking care of your favorite paintbrushes, you want them to last, so you can keep creating.