Table of Contents
Who doesn't love a stack of warm, fluffy pancakes? Forget the boxed mixes and dive into the delicious world of homemade pancakes! I'm going to show you how to make the best Good Old-Fashioned Pancake Recipe on Pan, right in your own kitchen. This isn't just any recipe; it's a step-by-step guide to achieving pancake perfection. We'll start by gathering simple ingredients you probably already have. Then, I'll walk you through creating the perfect batter – no lumps allowed! Next up, we'll conquer the pan, learning the secrets to achieving that golden-brown color we all crave. Finally, I'll share tips on serving and storing your pancakes. Whether you're a breakfast newbie or a seasoned pro, this guide will help you whip up a batch of pancakes so good, you'll never go back to store-bought again. Get ready to impress your family and friends with your newfound pancake skills! So, let's get cooking and turn your ordinary morning into a pancake party!
Gathering Your Ingredients for Perfect Pancakes on Pan
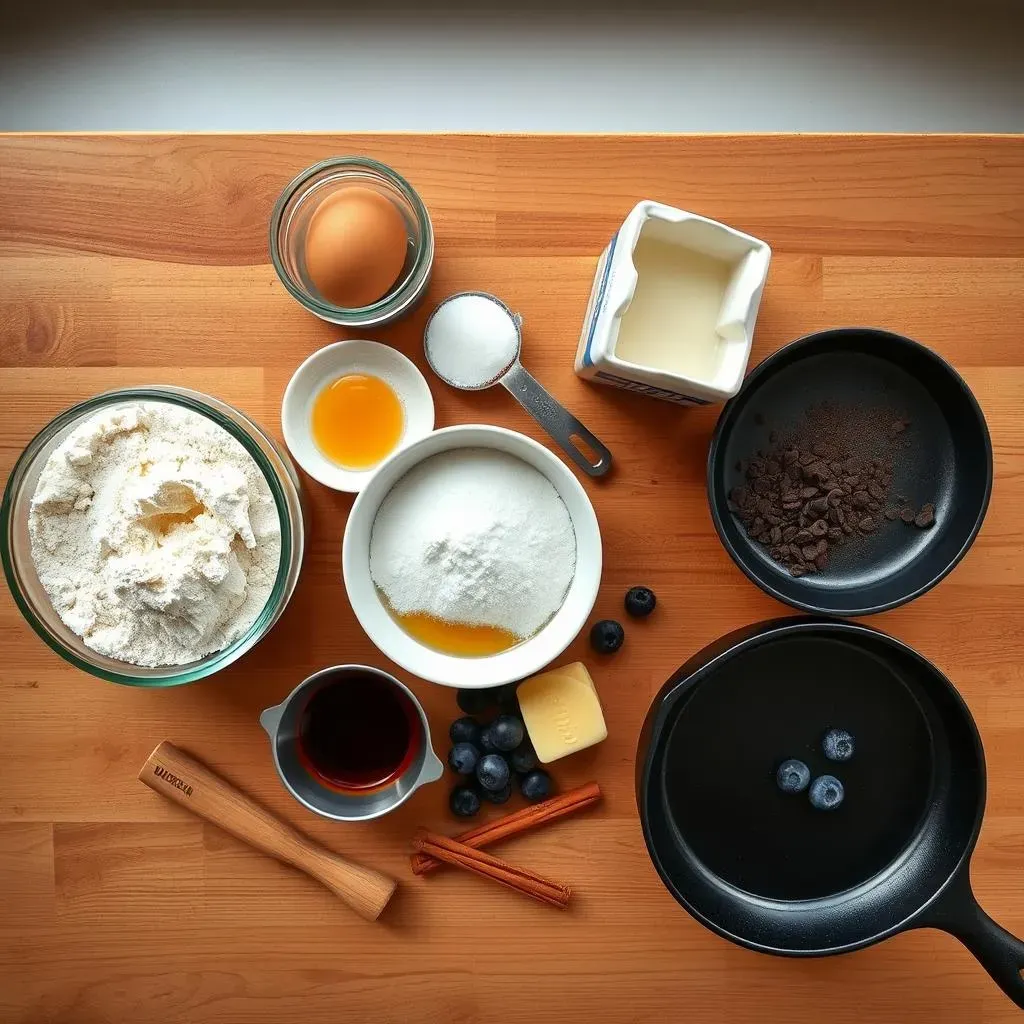
Gathering Your Ingredients for Perfect Pancakes on Pan
The Basics: Pantry Staples
Before you even think about flipping a pancake, let's talk ingredients.
For a classic pancake recipe on pan, you'll need all-purpose flour, baking powder, salt, sugar, milk, eggs, and melted butter.
I know, it sounds simple, but trust me, the quality of your ingredients matters.
I always opt for fresh baking powder; it makes a world of difference in the fluffiness department.
- Flour: All-purpose is the standard, but feel free to experiment with whole wheat or gluten-free blends.
- Baking Powder: The leavening agent that gives pancakes their lift.
- Salt: Enhances the flavors.
- Sugar: Adds a touch of sweetness.
- Milk: Provides moisture and richness.
- Eggs: Bind the ingredients and add structure.
- Melted Butter: Adds flavor and helps create a tender crumb.
Milk Matters: Choosing Your Liquid
Milk is more than just a liquid in this pancake equation.
It adds richness and helps create a smooth batter.
I usually go for whole milk because, well, why not?
But you can easily substitute with 2%, skim, or even non-dairy alternatives like almond or soy milk.
Just keep in mind that non-dairy milks might slightly alter the flavor and texture of your pancakes.
Pro Tip: Buttermilk adds a tangy flavor and extra fluffiness, but if you don't have any on hand, you can make a quick substitute by adding a tablespoon of lemon juice or vinegar to regular milk and letting it sit for a few minutes.
Optional Extras: Elevating Your Pancake Game
Now, here's where things get fun.
While the basic ingredients are essential, you can totally customize your pancake recipe on pan with a few extras.
Vanilla extract is my go-to for adding a hint of warmth.
You can also toss in chocolate chips, blueberries, or even a sprinkle of cinnamon for a little extra pizzazz.
Don't be afraid to get creative and experiment with your favorite flavors!
Ingredient | Purpose | Notes |
|---|---|---|
Vanilla Extract | Flavor | Adds warmth and enhances sweetness |
Chocolate Chips | Flavor & Texture | Semi-sweet, milk chocolate, or dark chocolate |
Blueberries | Flavor & Texture | Fresh or frozen (thawed) |
Cinnamon | Flavor | Adds warmth and spice |
Mixing the Batter: The Key to Fluffy Pancakes on Pan
Mixing the Batter: The Key to Fluffy Pancakes on Pan
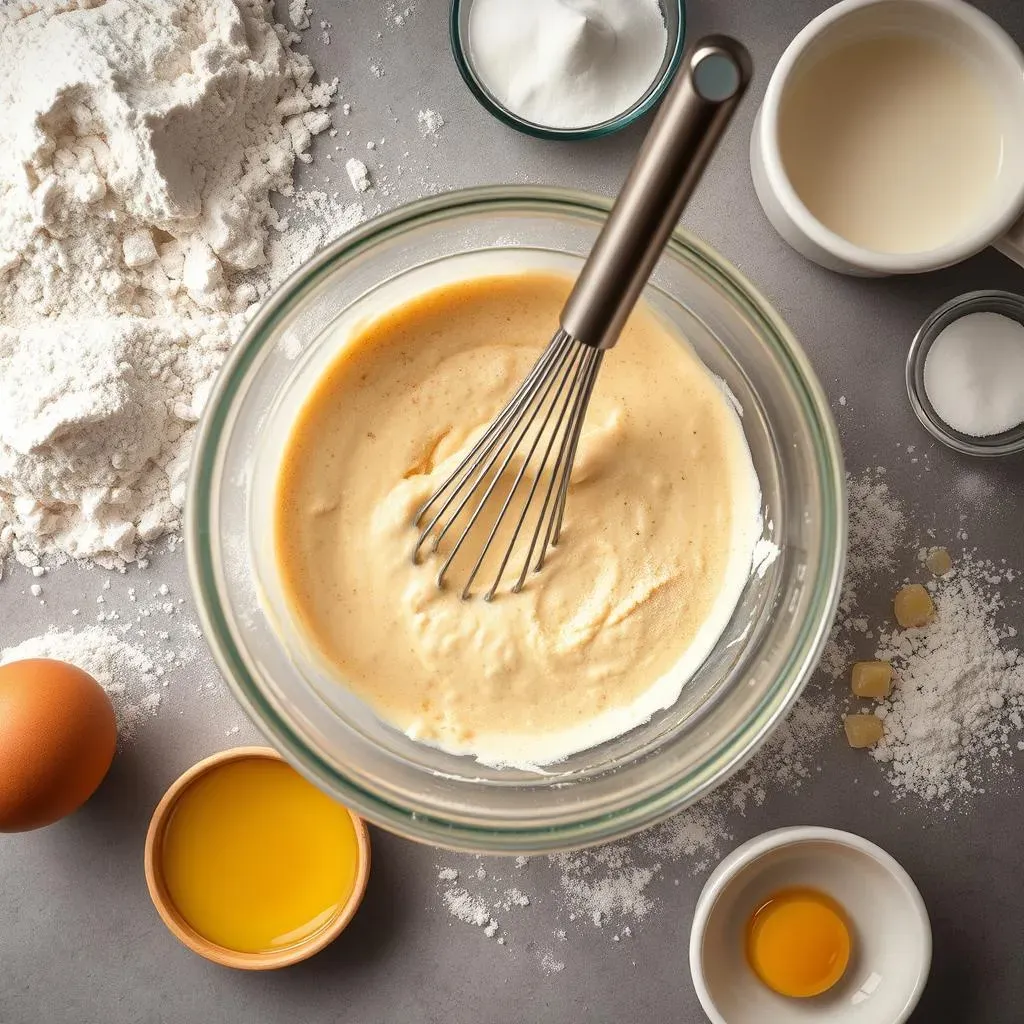
The Dry Ingredients Tango
Alright, let's get to the heart of pancake making: the batter.
First things first, grab a large bowl and whisk together your dry ingredients: flour, baking powder, salt, and sugar.
This step is crucial for evenly distributing the baking powder, which is what gives your pancakes that beautiful rise.
I like to use a whisk instead of a spoon because it helps break up any lumps and ensures everything is perfectly combined.
Think of it as a little dance party for your dry ingredients!
Why Sift? Sifting dry ingredients isn't strictly necessary, but it can help create an even lighter and fluffier pancake. If you're feeling fancy, go for it!
The Wet Ingredients Waltz
Now that your dry ingredients are ready to rock, it's time to introduce the wet ones.
In a separate bowl, whisk together your milk, egg, and melted butter.
Make sure your butter isn't too hot, or it might cook the egg.
Gently pour the wet ingredients into the dry ingredients.
Here's the secret: don't overmix!
Stir until just combined.
A few lumps are totally fine; in fact, they're preferable.
Overmixing Alert! Overmixing develops the gluten in the flour, resulting in tough, chewy pancakes. Nobody wants that!
Resting Period: Patience is a Virtue
This is the hardest part, I know.
But trust me, it's worth it.
Let your batter rest for 5-10 minutes before cooking.
This allows the baking powder to fully activate and the gluten to relax, resulting in lighter, fluffier pancakes.
Use this time to heat up your griddle or pan and prep your toppings.
You can thank me later.
"The key to a good pancake is a well-rested batter." - Some Pancake Expert (probably)
Cooking Your Pancakes on a Pan: Tips for Golden Brown Perfection
Cooking Your Pancakes on a Pan: Tips for Golden Brown Perfection
Preheating Perfection: Temperature is Key
Alright, you've got your batter, now it's time to get cooking.
The most important thing is to preheat your pan or griddle over medium heat.
If the pan is too hot, the pancakes will burn on the outside before they're cooked through.
If it's not hot enough, they'll be pale and sad.
How do you know when it's ready?
Here's my trick: flick a few drops of water onto the surface.
If they sizzle and dance around, you're good to go.
Pan Types: Non-stick pans are great for beginners, but cast iron pans provide even heat distribution and a beautiful golden-brown crust.
Greasing the Wheels: Choosing Your Fat
Next up, grease your pan.
I usually use butter because it adds a delicious flavor, but you can also use cooking spray or oil.
Just make sure you don't use too much, or your pancakes will be greasy.
A light coating is all you need.
I like to use a silicone brush to spread the butter evenly over the surface of the pan.
Butter vs. Oil: Butter adds flavor, while oil is more neutral. Cooking spray is convenient, but it can sometimes leave a residue on the pan.
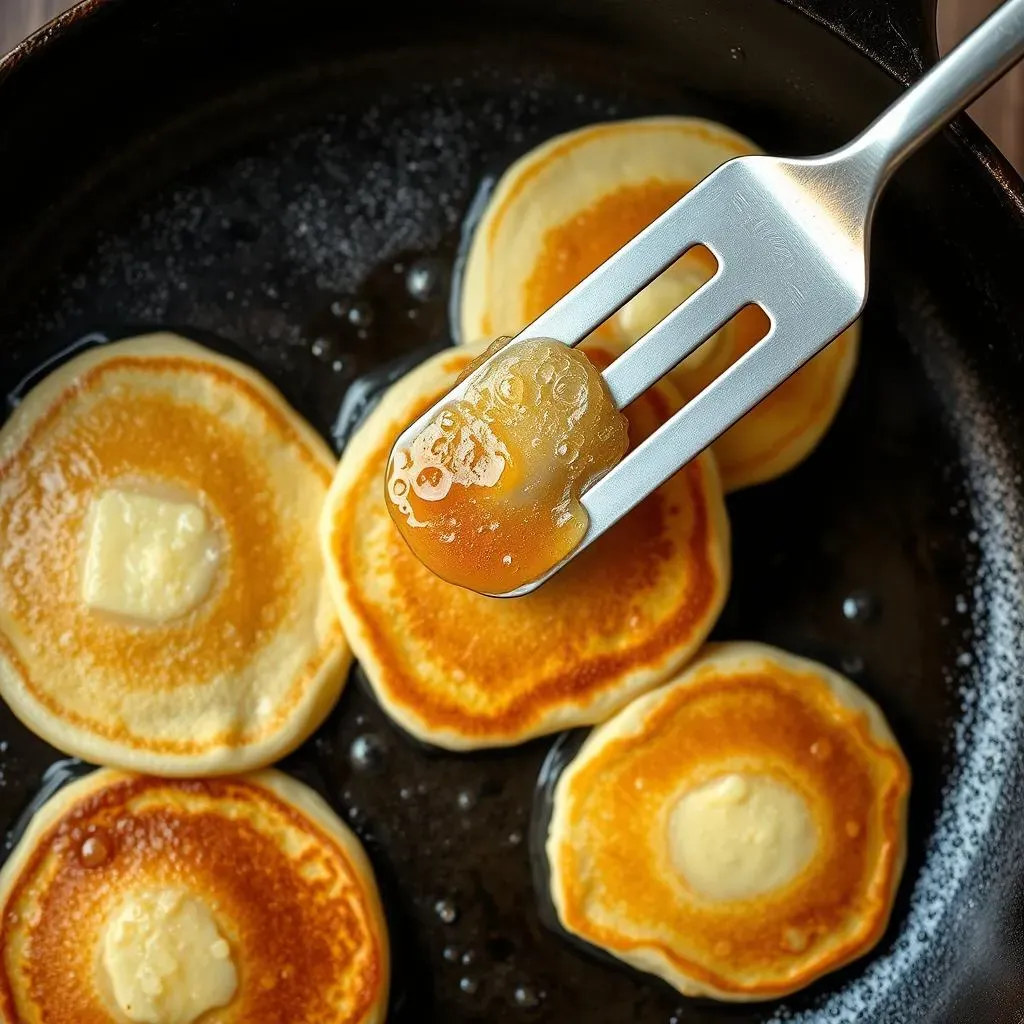
Pouring and Flipping: The Art of the Pancake
Now, for the fun part: pouring the batter.
Use a 1/4 cup measuring cup to scoop the batter onto the hot pan.
Don't overcrowd the pan; leave enough space between each pancake so they can spread out.
Let the pancakes cook for 2-3 minutes per side, or until golden brown.
You'll know it's time to flip when bubbles start to form on the surface and the edges look set.
Use a thin spatula to gently flip the pancakes.
Cook for another 1-2 minutes on the other side, or until golden brown.
Pancake Stage | Visual Cue | Action |
|---|---|---|
Pouring | Smooth, liquid batter | Pour 1/4 cup onto hot, greased pan |
Cooking (Side 1) | Bubbles forming on surface, edges setting | Wait 2-3 minutes |
Flipping | Golden brown underside | Gently flip with spatula |
Cooking (Side 2) | Golden brown underside | Cook 1-2 minutes |
Flip Tip: Resist the urge to press down on the pancakes while they're cooking.
This will flatten them and make them tough.
Let them puff up naturally.
Serving and Storing Your Homemade Pancakes
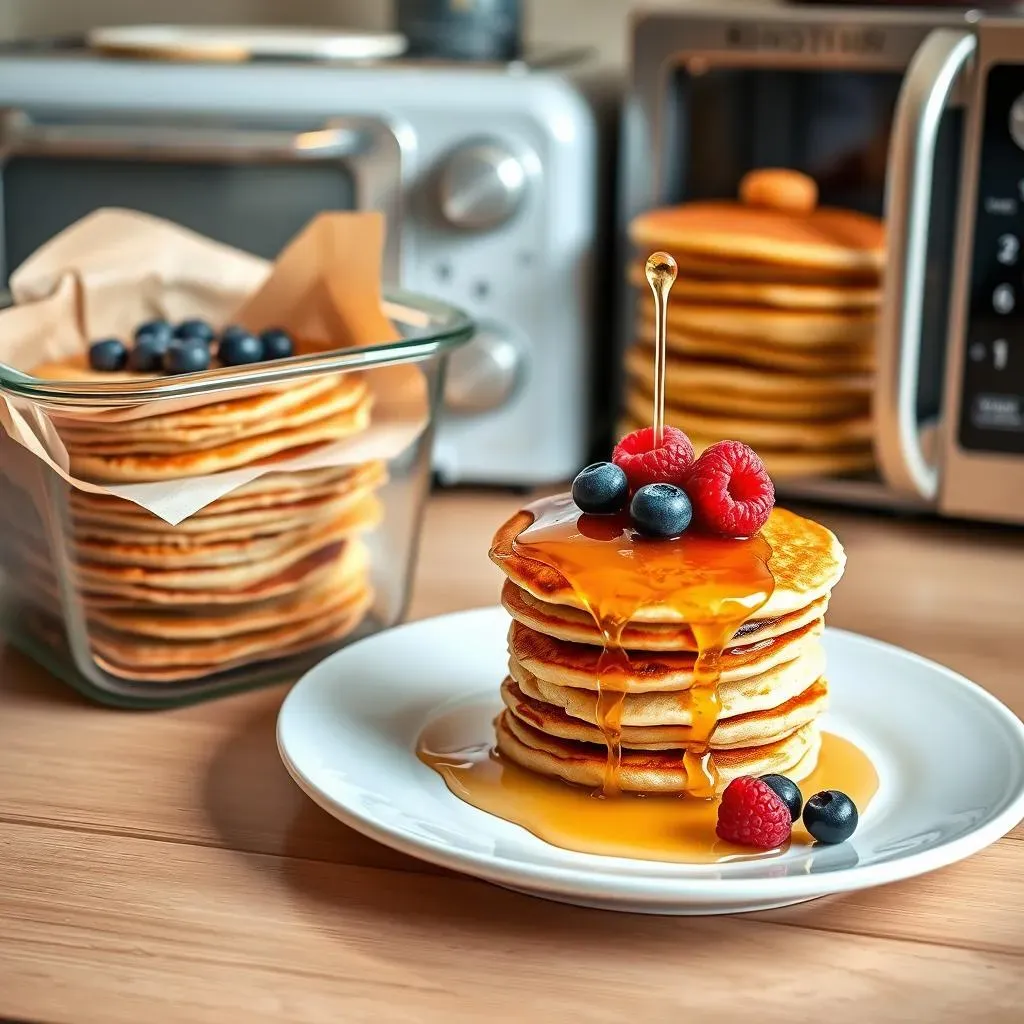
Serving and Storing Your Homemade Pancakes
Serving Suggestions: Beyond Syrup
So, you've made a beautiful stack of pancakes. Now what? Don't just drown them in syrup (unless that's your thing, no judgment!). Think beyond the bottle. Fresh berries are always a winner, adding a burst of flavor and a pop of color. A dollop of whipped cream? Absolutely. But have you ever tried a sprinkle of toasted nuts or a drizzle of honey? Trust me, it's a game-changer. And for the truly adventurous, a smear of Nutella or a scoop of ice cream can elevate your pancakes to dessert status. Get creative and have fun with it!
I remember one time, I was trying to impress a date with my pancake skills. I went all out with a homemade berry compote and a dusting of powdered sugar. She said it was the best breakfast she'd ever had! maybe she was just being nice, but I'll take it.
- Fresh Berries: Strawberries, blueberries, raspberries, blackberries
- Whipped Cream: Homemade or store-bought
- Toasted Nuts: Walnuts, pecans, almonds
- Honey or Maple Syrup: For a natural sweetness
- Nutella: Chocolatey goodness
- Ice Cream: Vanilla, chocolate, or your favorite flavor
Storing Leftovers: Keeping the Fluff Alive
Let's be real, sometimes you make too many pancakes. But don't worry, you can totally save them for later. The key is to store them properly to prevent them from getting soggy. Let the pancakes cool completely before storing them. Then, stack them in an airtight container or a zip-top bag, with a piece of parchment paper between each pancake to prevent sticking. You can store them in the fridge for up to 3 days or in the freezer for up to 2 months. When you're ready to eat them, just pop them in the toaster, microwave, or oven to reheat. They might not be quite as fluffy as they were fresh, but they'll still be delicious!
My grandma always used to say, "Waste not, want not!" She'd make a huge batch of pancakes every Sunday and we'd eat them all week long. She had a special trick for reheating them in the oven with a little bit of butter, which kept them nice and moist. I still use her trick to this day!
Storage Method | Timeframe | Tips |
|---|---|---|
Refrigerator | Up to 3 days | Store in airtight container with parchment paper between pancakes |
Freezer | Up to 2 months | Store in freezer bags, remove excess air |
Reheating (Toaster) | Until warm | Toast on low setting to prevent burning |
Reheating (Microwave) | 30-60 seconds | Cover with damp paper towel to retain moisture |
Reheating (Oven) | 350°F (175°C) for 5-10 minutes | Wrap in foil with a pat of butter |
The Sweetest Ending: Mastering Your Pancake Game
So there you have it – your guide to crafting perfect Good Old-Fashioned Pancakes on Pan! From gathering your simple ingredients to achieving that ideal golden-brown hue, you're now equipped to whip up a batch that rivals any diner. Remember, the key is in the batter: smooth, not overworked. And don't be afraid to experiment with flavors and toppings to make them your own. Whether it's a lazy Sunday breakfast or a fun family brunch, these pancakes are sure to bring smiles to the table. Now go on, get your pan hot and start flipping! Your journey to pancake mastery has just begun.