Table of Contents
Who doesn't love a stack of fluffy pancakes on a lazy weekend morning? But, let's be real, those boxed mixes can be a bit…meh. What if I told you that making a truly amazing pancake recipe out of scratch is easier than you think? I'm talking light, airy, golden-brown perfection, all from ingredients you probably already have in your kitchen. Forget those bland, store-bought mixes. We're diving headfirst into the world of homemade pancakes, where you control the flavor and the fluff. This isn't just a recipe; it's a journey to pancake mastery. We'll cover everything from gathering the right ingredients and mixing the batter like a pro, to flipping those cakes at just the right moment and even what to do with any leftovers (if you have any!). So, grab your whisk, dust off your griddle, and get ready to create the best pancakes you've ever tasted. Trust me, once you go scratch, you'll never go back!
Gather Your Goodies: Ingredients for the Best Pancakes
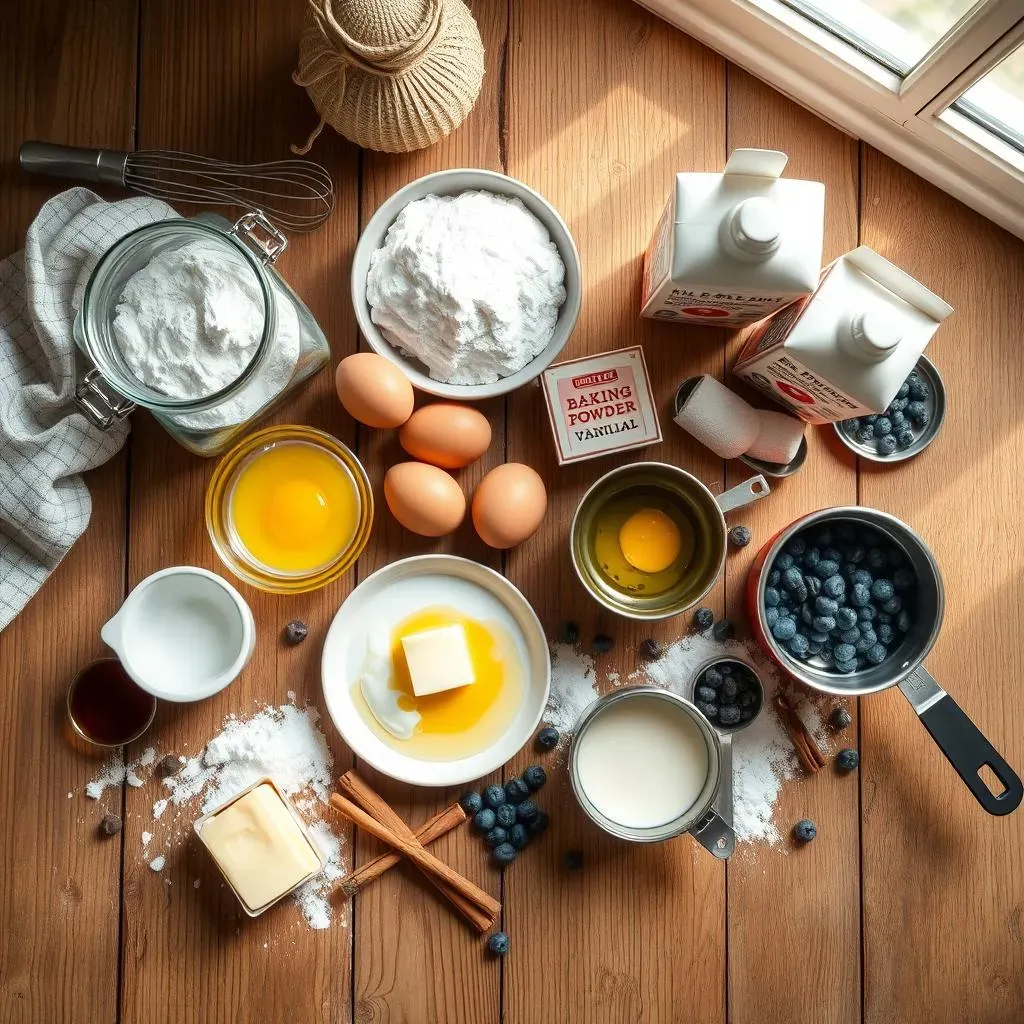
Gather Your Goodies: Ingredients for the Best Pancakes
The Basics: Flour, Sugar, and Baking Powder
First, let's talk about the foundation: flour. All-purpose flour is your go-to here. It's like the reliable friend who always shows up. But, if you're feeling fancy, you can experiment with whole wheat or even gluten-free blends. Sugar is next, adding a touch of sweetness and helping with browning. A couple of tablespoons usually do the trick. And then there's baking powder, the magic ingredient that makes those pancakes rise to fluffy perfection. Don't skimp on this one; it's what separates a flat pancake from a cloud-like dream.
Ever wonder why your pancakes are flat as a board? It's probably the baking powder. Make sure it's fresh! Old baking powder loses its oomph, and your pancakes will suffer the consequences. I learned this the hard way when my pancakes turned into sad, dense discs. Not a pretty sight (or taste!).
Wet Ingredients: Milk, Eggs, and Melted Butter
Now for the wet stuff! Milk is essential for moisture and binding everything together. Whole milk will give you a richer flavor, but any kind works. Eggs add structure and richness. Give them a quick whisk before adding them to the batter. And finally, melted butter (or oil) adds tenderness and flavor. Don't skip this step! It makes a big difference.
Ingredient | Amount | Purpose |
|---|---|---|
All-Purpose Flour | 2 cups | Structure |
Sugar | 2 tablespoons | Sweetness & Browning |
Baking Powder | 4 teaspoons | Leavening |
Milk | 1 3/4 cups | Moisture |
Egg | 2 large | Binding |
Melted Butter | 4 tablespoons | Tenderness & Flavor |
Optional Extras: Vanilla, Cinnamon, and More!
Want to take your pancakes to the next level? A splash of vanilla extract adds a warm, comforting flavor. A pinch of cinnamon gives them a cozy, spiced aroma. You can even add blueberries, chocolate chips, or mashed bananas for extra flavor and texture. Get creative and experiment with your favorite add-ins!
My personal favorite? A swirl of peanut butter in the batter. It adds a nutty, savory note that's simply irresistible. Just don't overmix it; you want those peanut butter pockets to stay intact. Speaking of overmixing...
Remember that time I added a whole cup of chocolate chips thinking "more is better"? Yeah, the pancakes were basically chocolate chip cookies disguised as pancakes. Delicious, but not exactly the light and fluffy texture I was going for. So, lesson learned: moderation is key, even with chocolate chips!
Mix It Up: The Secret to Fluffy Pancake Recipe Out of Scratch
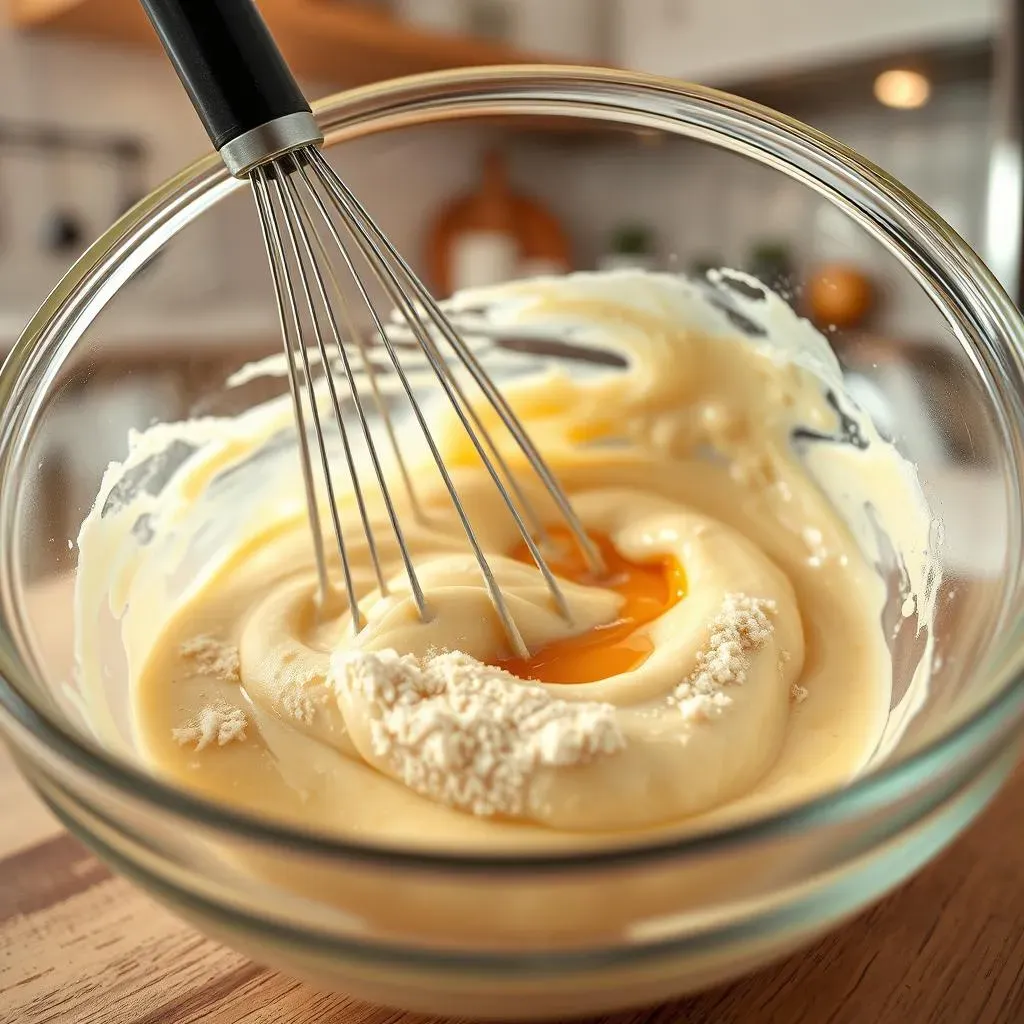
Mix It Up: The Secret to Fluffy Pancake Recipe Out of Scratch
Gentle Does It: Why Overmixing is the Enemy
This is where the magic happens, but also where things can go terribly wrong. The key to fluffy pancakes? Don't overmix! Seriously, I can't stress this enough. Overmixing develops the gluten in the flour, resulting in tough, chewy pancakes instead of light and airy ones. You want to mix until just combined, even if there are still a few lumps. Those lumps will disappear during cooking, I promise. Think of it like this: you're gently coaxing the batter together, not beating it into submission.
I remember one time, I was trying to impress a date with my pancake-making skills. I got so caught up in the conversation that I completely overmixed the batter. The resulting pancakes were so tough, we could have used them as frisbees. Lesson learned: focus on the batter, not the banter!
The Two-Bowl Method: A Pro Tip for Pancake Perfection
Here's a trick I swear by: the two-bowl method. In one bowl, whisk together all the dry ingredients: flour, sugar, baking powder, and salt. In the other bowl, combine all the wet ingredients: milk, eggs, and melted butter. Then, gently pour the wet ingredients into the dry ingredients and stir until just combined. This method ensures that the baking powder is evenly distributed and prevents overmixing. It's like a little secret weapon for pancake perfection.
Step | Description | Why it Matters |
|---|---|---|
Combine Dry Ingredients | Whisk flour, sugar, baking powder, and salt in a bowl. | Ensures even distribution of baking powder. |
Combine Wet Ingredients | Whisk milk, eggs, and melted butter in a separate bowl. | Pre-mixes wet ingredients for even incorporation. |
Combine Wet and Dry | Gently pour wet into dry, stirring until just combined. | Prevents overmixing and gluten development. |
Batter Consistency: Finding the Sweet Spot
What should your pancake batter look like? It should be thick enough to coat the back of a spoon, but thin enough to pour easily. If it's too thick, add a little more milk. If it's too thin, add a little more flour. The consistency is key to achieving that perfect balance of fluffiness and structure. And remember, a few lumps are okay! Don't try to create a perfectly smooth batter; that's a recipe for disaster (literally!).
I once tried to make pancakes with almond milk, and the batter was so thin, it was basically pancake soup. I added flour, and added flour, and added flour, until it was a thick, gloppy mess. The pancakes were dense and gummy. So, be careful when substituting ingredients; it can affect the batter consistency.
Flip It Real Good: Cooking Your Pancakes to Golden Brown
Flip It Real Good: Cooking Your Pancakes to Golden Brown
The Perfect Pan: Griddles, Pans, and Everything In Between
Alright, you've got your batter, now you need the perfect cooking surface. A griddle is great if you're making a big batch, but a non-stick pan works just as well. Cast iron is also an excellent choice, giving your pancakes a beautiful golden-brown crust. The key is to make sure your pan is evenly heated before you start cooking. A medium heat is usually ideal. Too hot, and your pancakes will burn on the outside while remaining raw on the inside. Too low, and they'll be pale and sad.
I once tried to cook pancakes on a camping stove, and it was a complete disaster. The heat was so uneven that some parts were burnt to a crisp, while others were still liquid batter. It was a good reminder that having the right tools makes all the difference!
Butter, Oil, or Spray: Greasing the Wheels for Success
To grease or not to grease, that is the question. The answer is yes, you definitely need to grease your pan! Butter adds a delicious flavor, but it can burn easily. Oil is a good alternative, especially if you're using high heat. Cooking spray is the easiest option, but it doesn't add much flavor. Whichever you choose, make sure to apply a thin, even layer to prevent sticking.
How do you know when the pan is hot enough? Here's a simple trick: flick a few drops of water onto the surface. If they sizzle and dance, you're good to go. If they just sit there, waiting for something to happen, your pan isn't hot enough. Patience, young Padawan!
Greasing Method | Pros | Cons |
|---|---|---|
Butter | Delicious flavor | Burns easily at high heat |
Oil | Good for high heat | Less flavor than butter |
Cooking Spray | Easy and convenient | Adds minimal flavor |
The Flip Side: Knowing When to Turn
This is the moment of truth: when to flip those pancakes? The key is to look for bubbles. When bubbles start to form on the surface and the edges look set, it's time to flip. Use a thin, flexible spatula to gently lift the pancake and flip it over. Don't press down on the pancake while it's cooking; that will deflate it. Cook for another minute or two, until golden brown on the other side.
And if your first pancake isn't perfect, don't worry! It's usually the sacrificial pancake, the one that tests the waters. Just adjust the heat and cooking time as needed for the rest of the batch. Remember, practice makes perfect (or at least, pretty darn good!).
Pancake Leftovers? Storage and Reheating Like a Pro
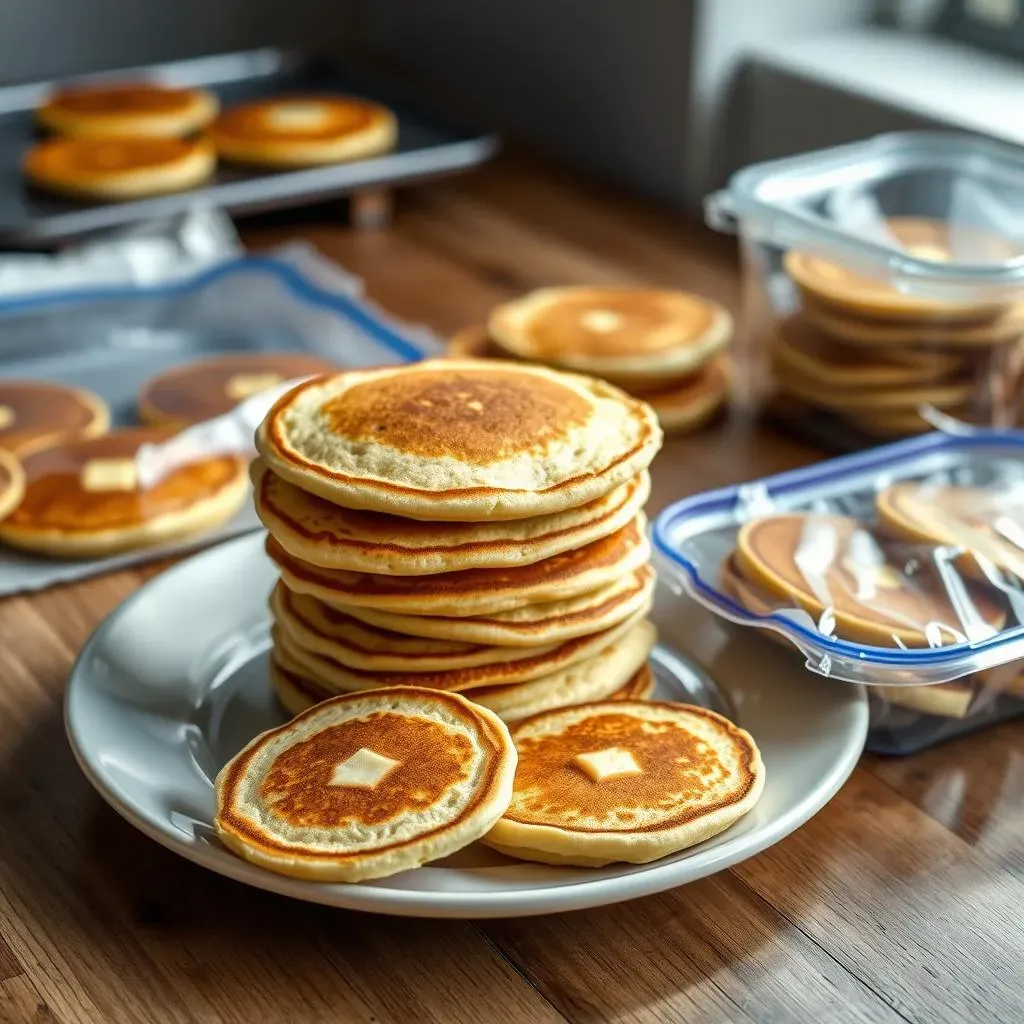
Pancake Leftovers? Storage and Reheating Like a Pro
Cooling Down: The Key to Proper Storage
So, you've made a mountain of pancakes, and somehow, miraculously, you have leftovers. First things first: let those pancakes cool completely before you even think about storing them. I know, the temptation to sneak a warm one is strong, but trust me, you'll thank me later. Warm pancakes trapped in a container create condensation, which leads to soggy, sad pancakes. Nobody wants that!
I learned this lesson the hard way when I packed warm pancakes for a picnic. By the time we got to the park, they were a sticky, mushy mess. It was not my proudest pancake moment. Now, I'm all about the cool-down period.
Storage Solutions: Fridge or Freezer?
Once your pancakes are cool, you have a choice: fridge or freezer? If you're planning to eat them within a couple of days, the fridge is fine. Just stack them in a resealable bag or airtight container with a piece of parchment paper between each pancake to prevent sticking. If you want to keep them longer, the freezer is your best bet. Lay the cooled pancakes in a single layer on a baking sheet and freeze for about 30 minutes. This prevents them from sticking together when you transfer them to a freezer bag. Once they're frozen solid, you can stack them in a freezer bag and store them for up to 2-3 months.
I'm a big fan of the freezer method because it allows me to have pancakes on demand. It's like having a secret stash of happiness in my freezer, ready to be unleashed at a moment's notice. Plus, it's a great way to reduce food waste. Win-win!
Storage Method | Pros | Cons | Best For |
|---|---|---|---|
Fridge | Quick and easy | Shorter storage time | Eating within 2 days |
Freezer | Longer storage time | Requires more effort | Storing for 2-3 months |
Pancake Recipe Out of Scratch: Your New Weekend Ritual
So there you have it: the ultimate guide to crafting the perfect pancake recipe out of scratch. It's all about simple ingredients, a little bit of technique, and a whole lot of love. Forget those pre-made mixes – you've now unlocked the secret to light, fluffy, and utterly delicious pancakes that will impress your family and friends (and, let's be honest, yourself). Whether you stick to the classic recipe or get creative with your own additions, the possibilities are endless. So go ahead, whip up a batch this weekend, and start your day with a smile. Happy flipping!